Almost all printers are wireless now. Although they can still be set up via a wired connection, people find the wireless connection more convenient. Brother wireless printers are also in this category. With the advancement of features and connection methods, users may find it difficult to set up their new printers on WiFi. But not anymore, because now you'll get the essential information about Brother wireless printer setup. So, get ready to connect your Brother MFC-J4345DW to WiFi.
Things to Do Before Starting Wireless Setup
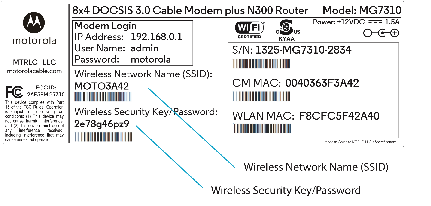
As the first step to setting up Brother wireless printers, these are the basic settings or information you must know about your network. So these two things are:
-
Network name/ SSID/ ESSID
-
Network password, network key, encryption key, or security key
If you're unaware of these settings, look at the side of your router. You can find a sticker on your router with these settings written on it. Or, you can check your router's documents to browse these details.
Once you have these settings, you can move on to the final steps of connecting your Brother printer to WiFi. So, we've concluded the main three methods for wireless connection. Look at them and check which method your printer will suit best.
Method 1: WiFi Direct Setup
This is the first method that lets you connect your printer to the computer without a router or WiFi access. As the name says, it's a direct setup with WiFi. Have a look at the instructions to do this on your Windows and Mac computers.
On Windows
-
Verify the Wireless Direct settings of your printer.
-
Then, connect your Brother MFC-J4345DW printer and Windows computer with a USB cable.
-
Run the Printer Setting Tool on your PC and tap the Communication Settings button.

-
Verify that Wireless Direct is checked in the Selected Interface under the General tab.
-
Now, press and hold the WiFi button on your Brother printer for a second and turn on the WiFi.
-
After that, select the SSID of your computer or mobile device and put in the password.
-
Once the connection is set up, the WiFi indicator will light blue.
Finally, you have completed the Brother wireless printer setup on your Windows computer.
On Mac
-
First, verify the Wireless Direct Settings of your Brother printer.
-
Then, connect your printer and Mac with a USB cable.
-
Now, run the Printer Setting tool on your Mac.
-
Check that the Wireless Direct option is ON under the Wireless LAN tab.
-
Then, press and hold the WiFi button on your Brother printer for a second and enable the WiFi.
-
Then, select the SSID of your printer and type the password.
-
Once the connection is set up, the WiFi will flash a blue light.
You've connected your Brother wireless printer to a Mac computer.
Method 2: Infrastructure Mode Setup
This method lets you connect your printer to your computer or mobile device using a WiFi access point or router. Follow the given instructions to set it up.
On Windows
-
First, connect your Brother MFC-J4345DW printer to the computer via a USB cable.
-
Then, press and hold the WiFi button on your printer for a second and enable WiFi.
-
Check that the WiFi indicator is flashing blue every three seconds.
-
Run the Printer Setting Tool on the Windows computer and tap the Communication Settings button.
-
After that, choose Wireless LAN for Selected Interface under the General tab.
-
Then, choose Infrastructure for Communication Mode under Wireless Settings in the Wireless LAN tab.

-
Put in your SSID, or click the Search button and select the SSID from the given list.
-
After that, type in the password.
-
Finally, tap the Apply button.
Finally, you've connected your Brother printer to WiFi using infrastructure mode on Windows.
On Mac
-
First, connect your Brother Brother MFC-J4345DW printer to a computer via a USB cable.
-
Then, press and hold the WiFi button on your Brother printer for a second and enable WiFi.
-
Check that the WiFi indicator should flash blue every three seconds.
-
Run the Wireless Device Setup Wizard from your printer driver package and follow the on-screen instructions.
-
After that, put in the SSID or click Search and pick your SSID network from the list.
-
Now, enter the password.
-
At last, tap the Apply button.
Once the wireless connection is set up, the WiFi indicator will flash in blue.
Method 3: WPS method
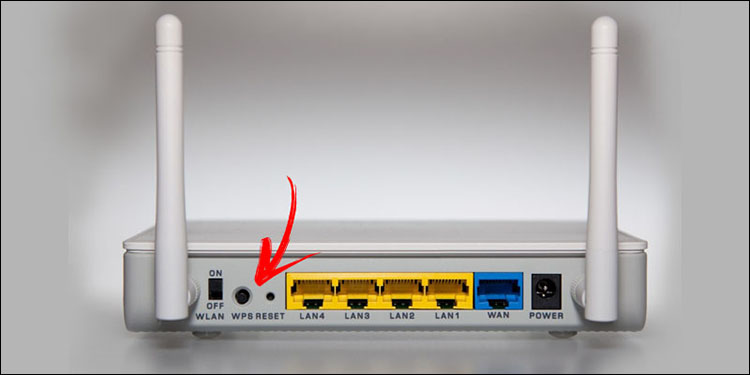
WPS (WiFi-protected Setup) is the last method we'll use for Brother wireless printer setup. However, this method only applies if your router supports the WPS push button. If it does, use the steps below to connect your Brother printer via the WPS method.
- Check that your WiFi router has a WPS sign.
-
Then, install your Brother printer within the range of your WiFi access point or router.
-
Now, press the WPS button on the router or access point and hold the WiFi button (on the Brother printer) for at least five seconds.
-
You'll observe that the WiFi indicator on your printer flashes blue every second.
-
Once the connection is established, the blue WiFi indicator light will flash.
Finally, you've connected your Brother Brother MFC-J4345DW printer to WiFi using the WPS push button.
Conclusion
You've seen the wireless Brother printer setup in three ways. All the methods are effective and connect your Brother printer to WiFi without hassle. However, the method also depends on your printer model. Overall, we've discussed three methods: WiFi Direct setup, Infrastructure mode, and the WPS push method. Using all these methods, you can connect your Brother printer to Windows and Mac computers wirelessly.
Source: Brother MFC-J4345DW


